and we are loving how it looks....
the long term plan is to create some built-in shelves on either side of the fireplace. my desk is on the right side and i am trying to find a design that we can do ourselves that will integrate a desk surface into the shelving. the black tv stand on the left will be gone too, but we need something to house the tv components for now.
here is a little breakdown of how we got this look.
originally there was a mirror above the mantle. i have always wanted built-in's on either side of the fireplace but could never figure out where to put the television. mounting it over the fireplace was out of the question because we didn't want to have to drill through the wall and possibly mess with the chimney box behind the wall.
then, i found
this on pinterest and knew this might be the answer we were looking for.
we ordered mounting hardware for the tv and attached it to the wall. i think that was the scariest part of the whole project because it scared the crap out of me to hang our tv to that little piece of metal. we have a plasma tv and that sucker is heavy. like really heavy. i don't think that i slept soundly for the first few days after we hung it waiting to hear the crash in the middle of the night. the mounting allows the tv to be pulled away from the wall about a foot, turned from side to side and tilt up and down. i didn't touch it for a long time because i was sure that i was going to cause it to crash down. it's really sturdy though and has been no problem at all.
the original design inspiration used plastic lattice lath but we couldn't find that and used wood instead.
we didn't have a specific plan. except for the one i drew on a piece of paper. and because i am such a great artist...don threw it away, it was so good. :)
anyway.....
we just kind of winged it. we made a few small calculations for the placement of the vertical and horizontal cross slats and i have to say, that we did pretty good for not knowing what we were doing.

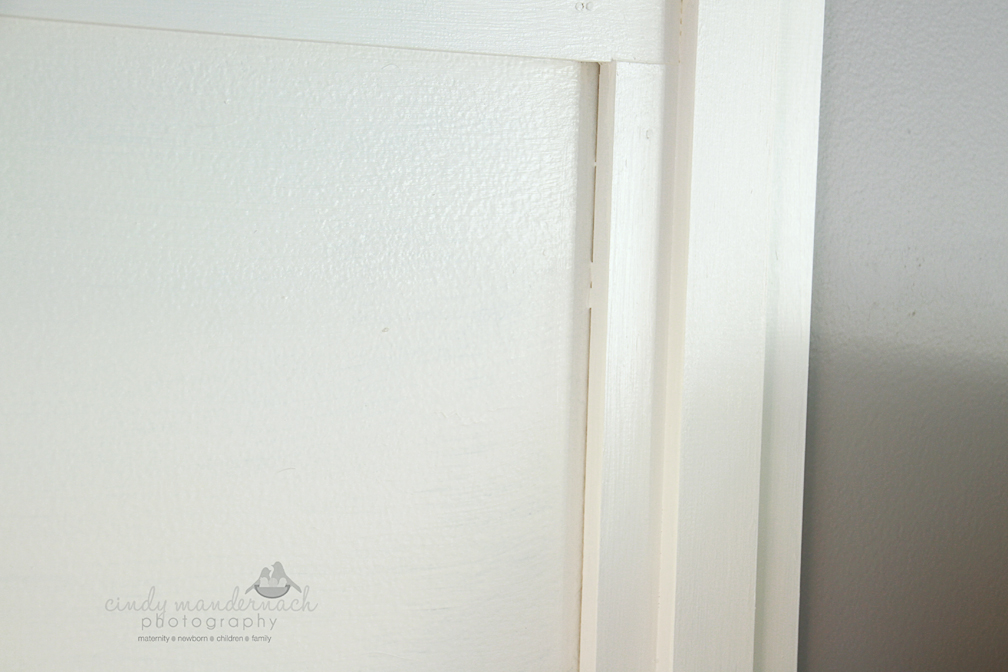
the hardest part was trying to decide how to run the wood down the side of the fireplace. because of the width of the mantle (which we had enlarged a couple of years ago) we didn't want there to be a huge gap between the fireplace columns and the wood slats. had we run the long channels on the outside of the mantle, there would have been a 11 inch gap between the slats and the columns where the arrow is. i felt that even though we were painting everything white, the dead space there would have looked out of scale. so we lined up the inside slat flush with the mantle edge. we had to be sure that the tract would be narrow enough for the top slat to cover the channel.

the outside slat placement had to be big enough to accommodate the cords and still be able to be covered by the top slat so we ended up notching out the piece of slat that covered the track so we could get the design closer to the existing fireplace moulding. the gap is just 5 inches and once painted and caulked, doesn't look at all out of scale.
i know that this sounds confusing because it was confusing to write, so if you have any questions about how we did this, feel free to email me.
here is a close up of how we notched it out.
(sorry about the watermark right on the spot i wanted you to see).
we then tested out how to place the cords to make sure that the channels were wide enough to accommodate them but still narrow enough to cover them with the top slat...

we looped the cords and attached them to the back of the television and the mounting frame so that there was some slack when the tv was pulled away from the wall or turned side to side. the extra slack would prevent the cords from pulling the slat cover away from the track. we used zip ties to attach the cords to the frame. easy peasy..
we tested the length of all of the cords (for the tv itself, the cable box, dvd player and surround sound system) before attaching the track cover slats.
there is a little room left if we decide to add another component and have to run the cord through the channels....
the top slats are nailed with thin brad nails so if we have to get at the cords for any reason, they would be easy to pull off.
this area will be covered when we add bookcases. someday.
the rest of the tracks were designed to look like raised paneling.
and the entire wall was painted to give the space a built-in look.
there were lots of gaps where the wood met the wall.
these were all filled with caulking.
while i was caulking, i almost fell off of the step stool when i saw this spider on the moulding up near the ceiling. ( i
hate spiders) i had to get the vacuum cleaner to suck it off of the wall because it was too high for the dog to reach. he likes to eat spiders and i take total advantage of that. for real. he's weird....
we are really happy with how this turned out...
and we are, frankly, astounded that it looks so good!!! we realize that the tv is mounted slightly off center but we were limited by the placement of the wall studs. the tv is so heavy that we had to be sure to attach the mounting hardware to the studs. i'll just decorate to off-set it..we can totally live with it.
the cost of this project was a little more than most of the other projects we have done in the past. the wood slats cost a total of about $120.00 but we couldn't find anything that would work for the look we wanted other than what we used. it was $1.27 a linear foot and we ended up using about 90 feet.
we thought about adding a crown moulding at the top where the wall meets the ceiling, and actually bought some but i think we'll wait until the built-ins are done before we worry about that.
the mounting hardware and frame for the tv was a
great deal on amazon at $59.00. we needed longer hdmi cables so we got 15 foot ones
similar to these at $14.00. they are cheap but they work great and saw no difference in picture quality when we changed them out. we already had the caulking so that was free. the paint (that we already had, too) was an oops paint from home depot for $5.00, but i didn't realize when i painted the wall that although the can said eggshell, it's more of a semi-gloss than what we originally painted the mantle with. it's okay for now but i may eventually repaint it with a satin paint so it's not too shiny.
under $200.00 for such a big change in the room.
we love it.....


.jpg)


 src="http://i1099.photobucket.com/albums/g399/sixtyfifthavenue/button4.jpg" />